Excel tutorials

The only Excel books you will ever need

  • The only constantly updated Excel 365 titles more…
  • Thoroughly covers Power Pivot and Power Query more…
  • Covers business intelligence and OLAP features more…
  • Simple, easy, understandable, 2-page lessons more…
  • Available as both printed books and e-Books more…
  • Used by schools, colleges and universities  more…
  • Available for 365, 2021, 2019, 2016 and Mac versions more…

Use the SUMIF and COUNTIF functions to create conditional totals

If you want to follow through with the YouTube video here is the sample file:

If you are working through the lesson from the book (shown below) the sample file is slightly different:

This lesson shows how to use the SUMIF and COUNTIF functions.

The SUMIF function is undoubtedly one of the “Top 10” Excel functions and most business workbooks will find a regular need for it.

SUMIF is such an important function that I decided to also publish this lesson as a free YouTube video that you can watch here but I’m so sure that you will also find the written lesson useful, so much so that I’ve even included it in the YouTube sample file set.

This article is an unedited lesson from one of the 28 short focused lessons in the Advanced Functions Session of my “Expert Skills” book.

Leave me a comment if you find the lesson useful.

note

The SUMIFS and COUNTIFS functions

The SUMIFS and COUNTIFS functions work in exactly the same way as the SUMIF and COUNTIF functions used in this lesson but they accept multiple criteria.

For example, if you needed to know the combined total salary for Male employees in the Sales department, you’d set the SUMIFS arguments as follows:

tip

Quickly make a range reference absolute

Many users type in those little dollar signs by hand, which is very time consuming.

Here’s a great time saver:

1. Select the entire range reference (for example D4:D17).

2. Press the <F4> key once. The range is then converted to absolute (for example $D$4:$D$17).

If you press the <F4> key more than once, you’ll cycle through all possible mixed cell references for the range.

note

Using wildcards in logical criteria

Sometimes you will only have a partial idea of what you need to find.

In this case, you can use the wildcard characters – the asterisk (*) and the question mark (?). It is easiest to explain how wildcards work with a few examples:

C*g
Finds Containing
Finds Citing
Finds Changing

S?d
Finds Sid
Finds Sad
Finds Syd
Finds Sud

In the above examples, you can see that the first search finds all words that begin with C and end with g. The second example only finds three letter words that begin with S and end with d.

Later in this session, in: Lesson 3 18: Concatenate strings using the concatenation operator (&), you’ll learn about concatenating strings. After this lesson, you will understand the following examples:

Imagine you have a range containing the values:

22 Cherry Walk
144 Cherry Road
Cherry Tree House
Cherry Tree Lodge

… and you want to construct a COUNTIF or SUMIF function based upon the partial string contained in cell A1 (for this example, let’s imagine that the word Cherry is in cell A1).

The criteria would be:

“*” & A1 & “*”

This would find all four values.

To find values that begin with the word Cherry, you would use the criteria:

A1 & “*”

This would find two values.

In the previous lesson, you used the IF logical function to return different values based upon a logical test that returned TRUE or FALSE.

SUMIF and COUNTIF are similar functions but are used to sum or count values within a range based upon a similar logical test.

This lesson’s sample workbook lists all of an organization’s employees along with their gender and department:

You’ll use the SUMIF and COUNTIF functions to list the total salary and headcount for each department, along with the total salary and headcount for each gender.

1. Open Headcount & Salaries-1 from your sample files folder.

2. Use the SUMIF function to calculate the total salary for each department.

  • Click in cell B21.
  • Click: Formulas->Function Library->Math & Trig->SUMIF.
    The Function Arguments dialog appears.

    There are three arguments for the SUMIF function:

    The Range argument defines the range in which to look for the department name. In this case, it is the range D4:D17 (the cells containing the Departments).

    The Criteria argument is the thing to look for within the stated range. In this case, it is the word “Sales” contained in cell A21.

    The Sum_range argument is the range containing numerical data that needs to be added up when the criteria is true. In this case, it is the range C4:C17 (the cells containing Salary values).

  • Complete the dialog with the following arguments:

Note the use of absolute references for each range. This will allow you to AutoFill the function for the Purchasing and Logistics totals.

  • Click the OK button.
  • AutoFill cell C21 to cells C22:C23 to display the headcount for the Purchasing and Logistics departments.

3. Use the COUNTIF function to calculate the headcount for each department.

COUNTIF works in exactly the same way as SUMIF but returns a count of all cells that match the criteria.

  • Click in cell C21.
    Click: Formulas->Function Library->
    More Functions->Statistical->COUNTIF.
  • Complete the dialog with the following arguments:
  • Click the OK button.
  • AutoFill cell C21 to cells C22:C23 to display the headcount for the Purchasing and Logistics departments.

4. Use SUMIF and COUNTIF functions to calculate the salary and headcount for male and female employees in cells B27:C28.

Use exactly the same technique as you did for Salary and Headcount by Department. The correct arguments for cells B27 and C27 are:

And:

5. Save your work as Headcount & Salaries-2.

You can download a copy of the workbook showing the formulas in action.

These are the only up-to-date Excel books currently published and includes the new Dynamic Arrays features.

They are also the only books that will teach you absolutely every Excel skill including Power Pivot, OLAP and DAX.

Share this article

Recent Articles

VLOOKUP inexact match illustration (chicken and egg).

VLOOKUP inexact match

VLOOKUP lesson with sample file that will teach you everything there is to know when creating a VLOOKUP inexact match Excel function.

VLOOKUP exact match

Simple VLOOKUP tutorial with sample file that will teach you everything there is to know when creating a VLOOKUP function with an exact match.

x-lookup-tutorial-part-one

Excel XLOOKUP function (part one)

The new Excel XLOOKUP function was introduced in the July 2020 Excel 365 semi-annual update.  It isn’t available in older versions (Excel 2019 and earlier). 

VLOOKUP using text strings

VLOOKUP using text strings

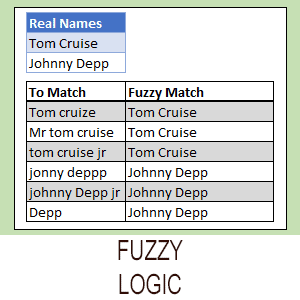
How to use VLOOKUP to search for a piece of text and return a matching value. This article also explains what VLOOKUP is and when to use it.

Leave a Reply

Your email address will not be published. Required fields are marked *

Which tutorial do you need?