If you try to insert a row or column inside a pivot table (or that intersects with a pivot table), an error message will appear:

There are a few different solutions to this problem, depending on what you are trying to do.
Calculated Fields and Calculated Items
If you need to add a row or column to your pivot table that performs some kind of calculation, you can achieve this by using Calculated Fields and Calculated Items. These can found under: PivotTable Tools > Analyze > Calculations > Fields, Items, & Sets.
You’ll find these features covered in depth in our Expert Skills course.
Moving the pivot table
If you don’t actually need a new row or column inside the pivot table (for example, if you’re trying to insert a column into an ordinary table above the pivot table), you can solve the problem by moving the pivot table out of the way.
You can move a pivot table using Cut & Paste, or by clicking PivotTable Tools > Analyze > Actions > Move PivotTable.
After inserting the rows and columns you need, you can move the pivot table back to its previous location.
Pasting the pivot table as values
If you need to insert cells within the pivot table itself, the simplest solution is to copy the pivot table and paste it as Values. This extracts the values from the pivot table, freeing you to use them exactly like any other cell.
The big downside of this approach is that the values will no longer function as a pivot table. You won’t be able to refresh them or automatically change their layout.
You can paste as values from the Home > Paste > Paste Special menu. This is covered in more depth in our Essential Skills course.
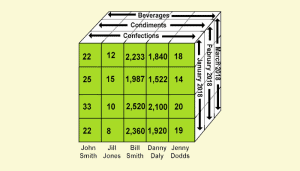
Using GETPIVOTDATA functions
If you place your pivot table on a different worksheet you can use the GETPIVOTDATA function to extract values from it and place them anywhere else in the workbook. This allows you to create any layout you need while preserving the pivot table’s features.
GETPIVOTDATA functions are automatically created if you click a cell inside a pivot table while you are writing a formula. They are covered in depth in our Expert Skills course.
It’s important to note that GETPIVOTDATA functions only work when the value they reference is visible within the pivot table. If a filter is applied to the pivot table it may cause GETPIVOTDATA formulas to return an error.
Using CUBEVALUE functions
In Excel 2013, Microsoft added a new feature to Excel known as the Data Model. Pivot tables that are based on a data model are known as OLAP pivot tables and can be converted into formulas that use the new CUBEVALUE function.
To convert an OLAP pivot table into formulas, click: PivotTable Tools > Analyze > Calculations > OLAP Tools > Convert to Formulas.
After converting the pivot table into formulas you can insert rows and columns just as you would with any other cell.
There’s a lot more to know about OLAP and the Data Model, both of which are covered in great depth in our Expert Skills course.